Gilded Frame with Painting Thoughts and Process

General / 03 April 2018

Recently i have finished a little side project of mine in Substance Designer. You might have already seen it. If not here is the link: https://www.artstation.com/artwork/4nKDn

As stated my goals were to test the viability of doing baroque style ornaments completely procedurally and to make some van Gogh style oil painting strokes procedurally.

Ornamental details like from the baroque era have long been one of my personal interests that i love to dabble in in my freetime. I collect books, refs, learned how to model them etc. 1D_Inc's modeling videos have been a huge inspiration and source of knowledge to me.

Before i go into detail explaining some steps about my process i want to answer one question. Is it worth going fully procedural with this type of ornaments? Not yet i would say. It's certainly interesting and fun to explore but i found the workflow a bit too cumbersome and limited to make sense in production. I'm sure we will get there eventualy tho. There are constantly new tools and nodes coming out. Allegorithmic does a great job improving their product, people from the community figure out new things and so on. But as of now i would say it still makes more sense to work conventionally. Even if you don't know how to model these things there are good ressources available to import them from. Textures.com has ornaments on offer, so does Jonas Ronnegard on his gumroad. You can import the alphas and safe you a lot of work or you kit bash a hipoly model.

The Frame

First thing to do was to create a rectangular shape with a gradient then apply a profile to it via a curve node:

Here you can see two ways of doing it (i'm sure ther's more). The above method uses a simple bevel to create the gradient. I opted for the method from below with a splatter rectangular (custom node from Share) because my thinking was that when i use the same node to apply repeating elements around the frame it would be easier to expose and link parameters together.

For the profile i looked up some refs and recreated one as good as i could. Obviously looks a bit different with the scale of SD's editor so best advice from me is to have the 3d view open with tesselation and keep eye balling while doing it. Afterwards i did an auto level and a slight blur (so the corners where the gradients meet wouldn't be completely sharp).

Ornaments

I tried to make some baroque leaf ornaments but that didn't turn out succesfully so i kept it relatively simple with a shell shape, some note shapes and a rose bud. In the end it might not be super important to be super realistic with the ornaments. Something like this frame can be made to read correctly with a simpler setup if its just for a random prop or something.

I made use of a bunch of custom nodes such as Ilya Kuzmichev's curve drawing system and Bezier curve editor.

The swirl node was very important to get the little curls on the ends but was also a source of frustration. I either have to try to come up with something better or hope someone else will. What would be great is some swirl with falloff settings.

Putting everything together for the frame was just a matter of lots of blends and mirrors. Frame and ornaments were assembled via normal map blending because i couldn't quite figure out a satisfying result via height map.

The Painting

This looks perhaps more complicated than it is. The important things to know are that i used an id map that i separated masks from for tile samplers. I layered the colors on top of each other one by one because i didn't want the strokes to be a colorful mess that uncontrollably blend into each other and don't resemble real painting technique.

The direction of my strokes was controlled via a flow map that i plugged into the vector map input of the tile samplers. 

The colors i simply extracted from a bitmap that i liked. Read my last blog post if you want to learn more about that.

I hope this was a useful insight to some readers. Please feel free to ask in the comments if you have questions.

Coloring tips & tricks for SD with external albedo sources

General / 29 March 2018

Something that i've been doing a lot ever since i started using SD is to source my gradients for coloring from external albedo bitmaps. They can be from places like Megascans, Textures.com or your own.

The advantage to me is that i very quickly get some nice gradients with colors and values that fit the theme of my materials and sit in the right PBR ranges. In combination with transforms, blurs and gradient dynamic i get a plethora of gradients to work with and i can test and iterate very quickly for what works and looks nice.

Let's take a look at a rock cliff substance that i'm working on:

1) First i import or link an albedo texture. In this case i used one from a Megascans rock model. (Word of warning: This probably isn't a good idea if you use Substance integrations for Unity, Unreal etc. since it will increase the size of your sbs file. But for offline works it is fine. Alternatively you can however just pick a regular gradient from an albedo texture and work with that instead)

2) I zoom in with a transform. The further you zoom in the less granular the gradients will be. You can also use a blur node if you need smooth gradients. What i'm looking for in this step is how the colors are distributed in the x or the y axis. This will be the actual gradient variations once it's plugged into a gradient dynamic. So if you want for instance a gradient that goes nicely from one color to the other you have to look for one in the source albedo and use the transform accordingly.

3) Often when you just hook up your height map straight into a gradient or gradient dynamic you get very noticable color bands. This works for some things but often it's not what you want because it looks wrong or gives your material away as procedurally colored right away. So what i often do is to blend the height map beforehand with a grunge or noise. This breaks up the bands and gives you more natural looking results.

4) This is where i plug my albedo color source into a gradient dynamic. As you can see in steps 3, 4 and 5 i do everything twice with a bit of variation and do some blends with masks. It's all about the subtle variations when you want to avoid the procedural look.

5) Some color adjustments because i wanted a slightly darker and less saturated rock surface.

Now lets take a look at how i colored the lichens:

If you want to know how to make lichen shapes like this you can watch the "Learn How to Create the Iceland Cliff Material with Daniel Thiger" on the Allegorithmic youtube channel or download his substance from Substance Source.

6) I plug the lichen mask into a flood fill and then a flood fill to position node.

7) In this step i use a neat little position to color node that i got from Substance Masters Vol 2. You can very easily make your own tho with a pixel processor. It is explained in this blog post from Qu Bin: https://www.allegorithmic.com/blog/qu-bin-weaves-fibrous-fabrics-substance-designer

https://www.allegorithmic.com/sites/default/files/image3_6.jpg

I feed the position to color node with the position map of the lichens and again a rock albedo from Megascans. This one has some nice color variation from oranges to pinkish greys. What it does is that it picks one uniform color from the source for each of the position map "islands". Ther's no grain, no gradients, no banding. So this is fantastic to get a solid base with nice color variations that look interesting and will help to sell a more natural and believable look for your substance.

8) I also plug the albedo source and lichen mask into a regular gradient dynamic and then do some blending with the result from the position to color node to add fine detail. Then i mask out some parts from the lichen mask before i blend them ontop of the rock surface.

Final tip: If you happen to go a bit overboard with your color modulations or if instead of an albedo you use a diffuse texture or photo source you should plug in a albedo safe space node somewhere along the way or before your final output. This will ensure that your colors while not 100% PBR correct will at least be within a plausible range for the render engine.


Learning Shadertoy to learn SD Pixel Processor

General / 19 March 2018

Let's talk about pixel processor. There are a small number of good tutorials for it out there but you can count them on one hand and sadly none are comprehensive enough that they would allow you to go from absolute beginner to pro. I suspect the reason is that for one SD is still a very niche product in the grand scheme of things but also that using the pixel processor is perhaps outside the comfort zone of many less tech oriented artists. It certainly is for me.

Personaly i only have very bare-bones experience with coding and in terms of math my brain always felt broken. I know what a function is and a few other basics but that's all.

Nonetheless i've experimented with pixel processor in the past and will continue to do so. I have studied what information i could find on the Allegorithmic website, Youtube and by trying to reverse engineer some pixel processors. And another resource that turned out to be very useful is Shadertoy, which i want to talk about in this blog post. To be clear i don't want this post to be a tutorial in itself but to give food for thought. Maybe this information will prove useful to someone who reads this.

For those who don't know Shadertoy is a website that allows you to code shaders inside your web browser. The site is full of examples by users and the great thing about it is that you can look at their code and learn from it.

To pixel processor this relates in so far as there is a big overlap between its functionality and the way shaders work. Patterns, filters and effects - a lot of it is similar if not the same. And pixel processor comes with many of the same math functions and so on.

To demonstrate this we will take a look at a video tutorial.

I followed this tutorial very closely and was able to replicate each step in pixel processor:

Everything he talks about is there, the change of coordinate system, getting the distance, setting radius and even the function for smoothing the edge of the circle.

This is just a very simple example but more complex things translate aswell. Maybe some will remember this from Facebook, about a year ago i shared this mini tutorial which was also based on something that i picked up from Shadertoy:

Different ways of creating directional masks in Substance Designer

General / 16 March 2018

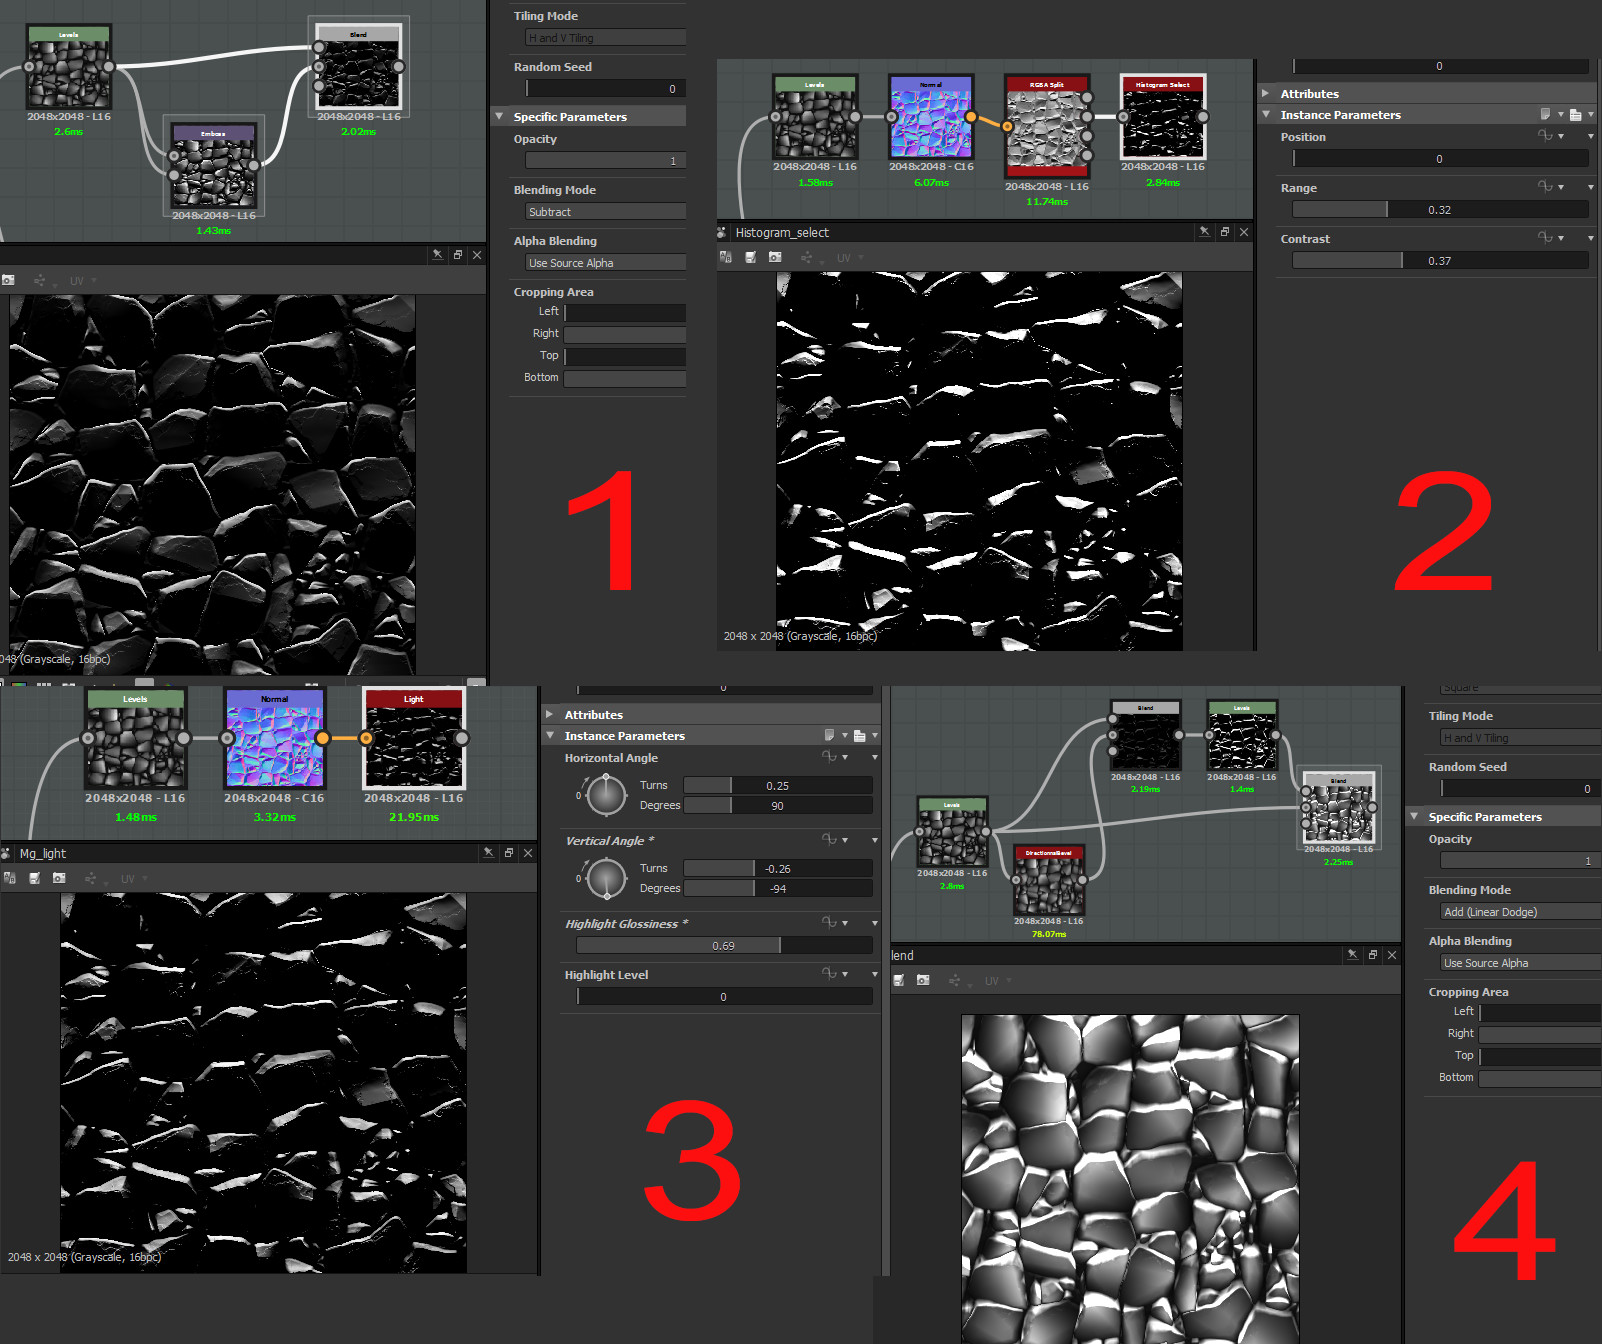
Last night user Ryan asked on Discord how to make a mask based on normal direction. I had some ideas and Allegorithmic's Froyok added another one (number 3):

1) You feed a height map into both inputs of an emboss node, set direction and intensity and then subtract the original height map from the embossed result.

2) You turn your height map into a normal map, use RGBA split node to split the channels and then use a histogram select on either the red or green channel outputs.

3) Again you turn the height map into a normal map and then use a light node.

4) This method fits into the theme of my last blog post. You use the directional bevel node from Substance Share and subtract the original height map from the result. As you can see with some level adjustment this method could work super well for a thick snow layer or something along those lines.

Allegorithmic's NiclasW also commented that it's possible to use a pixel processor. If you know how or know other methods to create directional masks please feel free to add your knowledge in the comments.


Experiments with directional bevels in Substance Designer

General / 12 March 2018

Over the last couple days i've been playing around with directional bevels in my freetime. Goal is to test feasibility of proceduraly generated scifi walls/panels that look like they came from hipoly models and allow for a lot of variations by simple change of random seeds.

So far this has been promising albeit i forsee some issues with placement of screw/rivets/greeble elements based on masks. I haven't found a good procedural solution for that yet which doesn't rely on a lot of manual placement/adjustments. If you have any ideas for that i would love to hear about it!

For the directional bevels a number of custom nodes from the community have returned interesting results:

1. Directional Bevel by Fabien Forestier - straight forward, not much computation time, therefore good for quick iterations

2. Perspective FX by Alexander Prokopchuk - more versatile options

3. Perspective Tool by Vincent Dérozier (purchased on his gumroad) - similar to Alexander's node

Other nodes that found very helpful in this endeavour:

1. Masked Edge by teto45 - creates a smooth edge where two blended height maps meet so very useful for that subdiv modeled look

2. Stack Auto by teto 45 - blend node that stacks two height maps on top of each other

First i just messed around with some patterns to see where it leads me:

As you can see directional bevels are great to create something that has a nice depth to it and a certain modeled quality.

Then i dug deeper and tried to combine some directional bevels with tile sampler inputs to create actual walls:

Some more examples:

I will keep experimenting. It's definitely a good way for getting a good base to start with.