Substance Designer - Random Things 4

Tutorial / 09 May 2020

Hey everyone!

I have recently started to share things on Twitter on a more regular basis. Tips & tricks, wips etc. If you follow me there you have already seen the tips below. Please feel free to follow me if you are interested to read more of these and what else i'm up to. twitter.com/flownepp

This one was quite popular and went viral. Just a simple setup to create a really nice rosette shape or similar in a very small number of nodes. I also like this one a lot personaly because it produces nice results reliably from all kinds of settings and slider tweaks.

Another neat little setup for interesting circular shapes using the not so often used alpha blend mode. With the regular greyscale blend modes these shapes would intersect with each other. Could be useful for things like asian patterns perhaps?

This is how i created the linework for my Borderlands inspired substance.

I believe i shared this or a similar one before. It shows how you can use Gradient Dynamic to create highly tweakable and randomized profiles for your shapes.

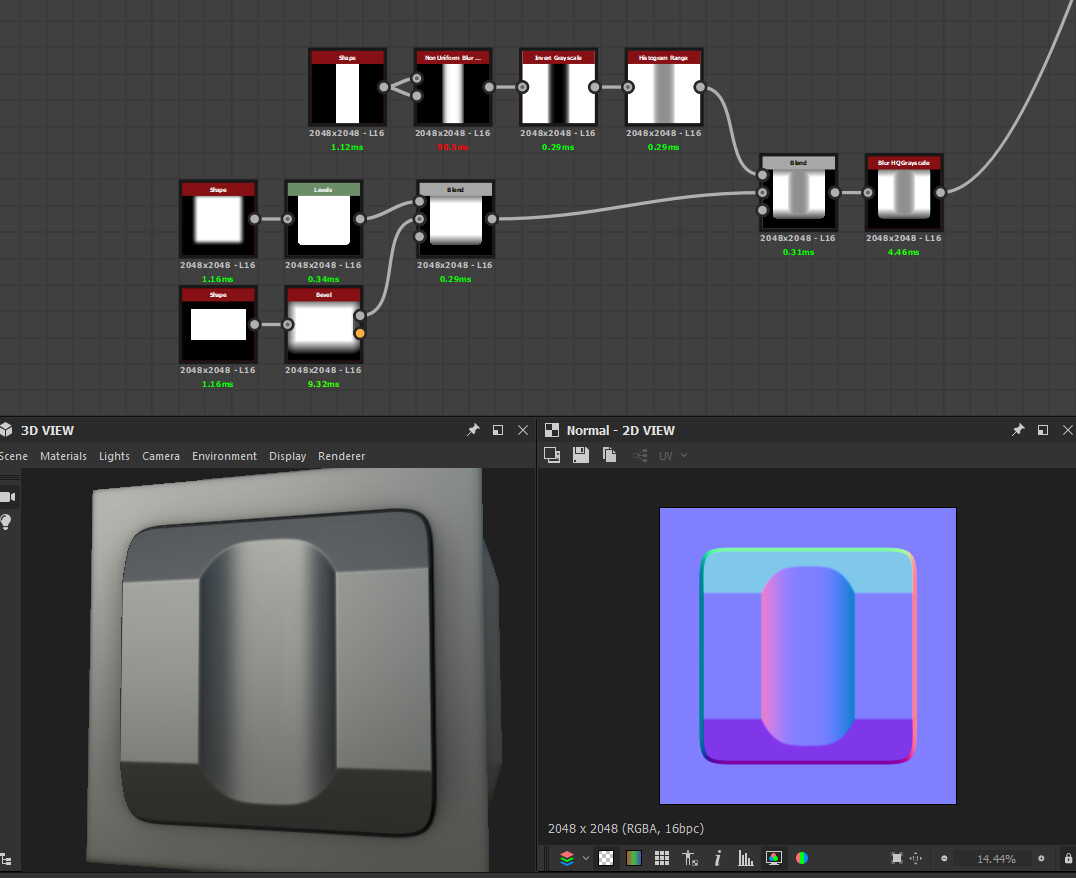
You can use Anisotrophic Blur and a levels/histogram to chamfer corners of your shapes.

Small update on my new edge wear node. It is still in the works. I updated SD last week and now i unfortunately have to deal with a bug that prevents me from seeing the effects of some exposed parameters when i work on presets. I consider this quite important additions before i can release the node tho because good presets will make the node so much more powerful and easy to use.

Using Megascans Imperfections as Substance Designer grunge nodes

Tutorial / 07 March 2020

Hey everyone! Just a quick explanation since the question came up how i used Megascans in my last portfolio substance.

I use a bunch of custom grunge nodes in my SD workflow that work exactly like the default ones but have bitmaps from megascans imperfections as their root node.

The sbs file is infact just a copy paste of one of the default grunge nodes. So it's very easy to make your own versions. To me it's not important at all to work 100% procedurally. A bit of real world data can really help to sell a substance and can be a time safer. Just be aware that file sizes are a lot bigger when bitmaps are included.
  

Substance Designer - Random Things 3

Tutorial / 29 April 2019

From early on using Substance Designer i made it a habbit to always save useful bits and pieces of node graphs that i stumbled upon while doodling or experimenting. I have a extra folder for larger graphs and i have a dedicated sbs file where i just copy paste small things that could become useful at some point. Inside the file it looks like this:

Let me show you some examples:  

This is a super simple setup to create some interesting patterns. Playing with any of the settings or replacing the checker input with something else creates a plethora of different results.  

Another nice and simple way to create interesting patterns is via quantize and edge detect.  

Similar to quantize non-uniform blur can be used to create patterns. Keep the samples down to 1 and play with number of blades, intensity and different shapes.

Gradient Dynamic can be used for more then just coloring. Shamelessly advertising for my Mirrors Pluse node here once again but as you can see it's possible to create a nice frame from a random splodge.  

A damascus steel pattern can be generated by running a highly tiled Gradient through a vector warp.
  

Substance Designer - Blending Woes

Tutorial / 08 April 2019

Hey people! First of all i want to say thank you to everyone who has purchased my Mirror Plus node. I have some ideas for improvements so keep an eye out for updates.

For myself the node has been very valuable so far on my quest for a comprehensive sci-fi workflow and toolset.

As you can see it helps tremendously to create something with a small number of nodes. Right now i use alphas from Jonas Ronnegard's sci-fi hardsurface kit as inputs for prototyping. My goal is to make my own set of alphas and generators with help of my nodes eventualy. You can also see the id map node in action that is available for free from my gumroad. I still have to figure out where to go with this. Substance Painter is an option that works but i'm also hoping for Alchemist and Quixel Mixer to be compatible soon. I want to texture with smart materials and masks in the end to speed things up and have consistency across my materials.

Working on my own alphas and generators over the weekend i ran into an interesting problem that made me realize that i actualy didn't knew as much about blending as i thought i did. I always treated subtract or multiply modes as some kind of boolean but thats not how it works which became blatently clear when i tried to carve out a cylinder shape from another shape with slanted edges.

The thing with subtract for example is that it subtracts the same amount from the slanted parts and also affects the whole length so the resulting shape looks wrong. The only way i got this to work in the end was by inverting the cylinder shape and tweak histogram position. Then the blend was set to min darken 1. To me this feels too complicated and so i ended up making my own blend node.  

This is more straightforward. I also added option for a mask and blurring the new edges so i can control this without having to blur the whole shape afterwards. Node is still a bit slow so that needs to be optimized.

The graph for the blending operation itself looks like this inside pixel processor:


Baking Tiled Material Blends in UE4

Tutorial / 29 December 2018

Hey people!

Been a while that i posted anything on my artstation. Last couple months have been extremely busy for me. I moved twice and worked on the release of our game Insurgency: Sandstorm (check it out on Steam: Link ).

One thing that i was confronted with during optimization pass was the need to use simpler shaders. I had this neat little blend master material set up for the level designers/artists so they could create material blends as they saw fit. The material works well for creating nice variations using height lerps and various gradient inputs to blend between materials directly in the editor but it is expensive using a lot of shader instructions and texture inputs.

We used the 'Merge Actors' option in UE4 before to create optimized texture atlases from multiple assets so i figured that maybe this could work to "bake" down the material blends aswell. And it works!

What you need is a simple plane mesh (unwrapped to 0-1 space) in an empty level. Place it at 0,0,0 and drop your blend material on it (this should work with vertex color blended materials also). In my example above you see a blend between yellow bricks and burned plaster materials. Select the mesh, right click and choose "merge actors". The following menu will pop up:

Under the "Mesh Settings" make sure to use lod0, under Material Settings select "Merge Materials" and underneath there you can now set the texture size and which maps to "bake". Hit "Merge Actors" and specify an output folder.

There you have it. The material and mesh that it created can be deleted. Unfortunately it doesn't create a RMA mask and the textures need to be renamed manualy but you can right click on the mask textures, export and then put them back together as an RMA mask texture in Photoshop that you can reimport.

Obviously this isn't a substitute for Substance Designer or Quixel Mixer but this info could be useful if you want to iterate on some blends inside UE4 within the actual context of your game/scene or the need for optimization emerges.